本篇文章介绍下Nginx有关内容,Nginx是一个开源且高性能、可靠的Http Web服务、代理服务。
开源:直接获取源代码,高性能:支持海量并发,可靠:服务稳定
Web服务有很多,选择Nginx是因为他的轻量化,功能模块少(源代码仅保留http与核心模块代码,其余不够核心代码的作为插件来安装)代码模块化,对于开发人员友好。
目录
Nginx与Apache区别
Nginx安装方式
Nginx安装流程
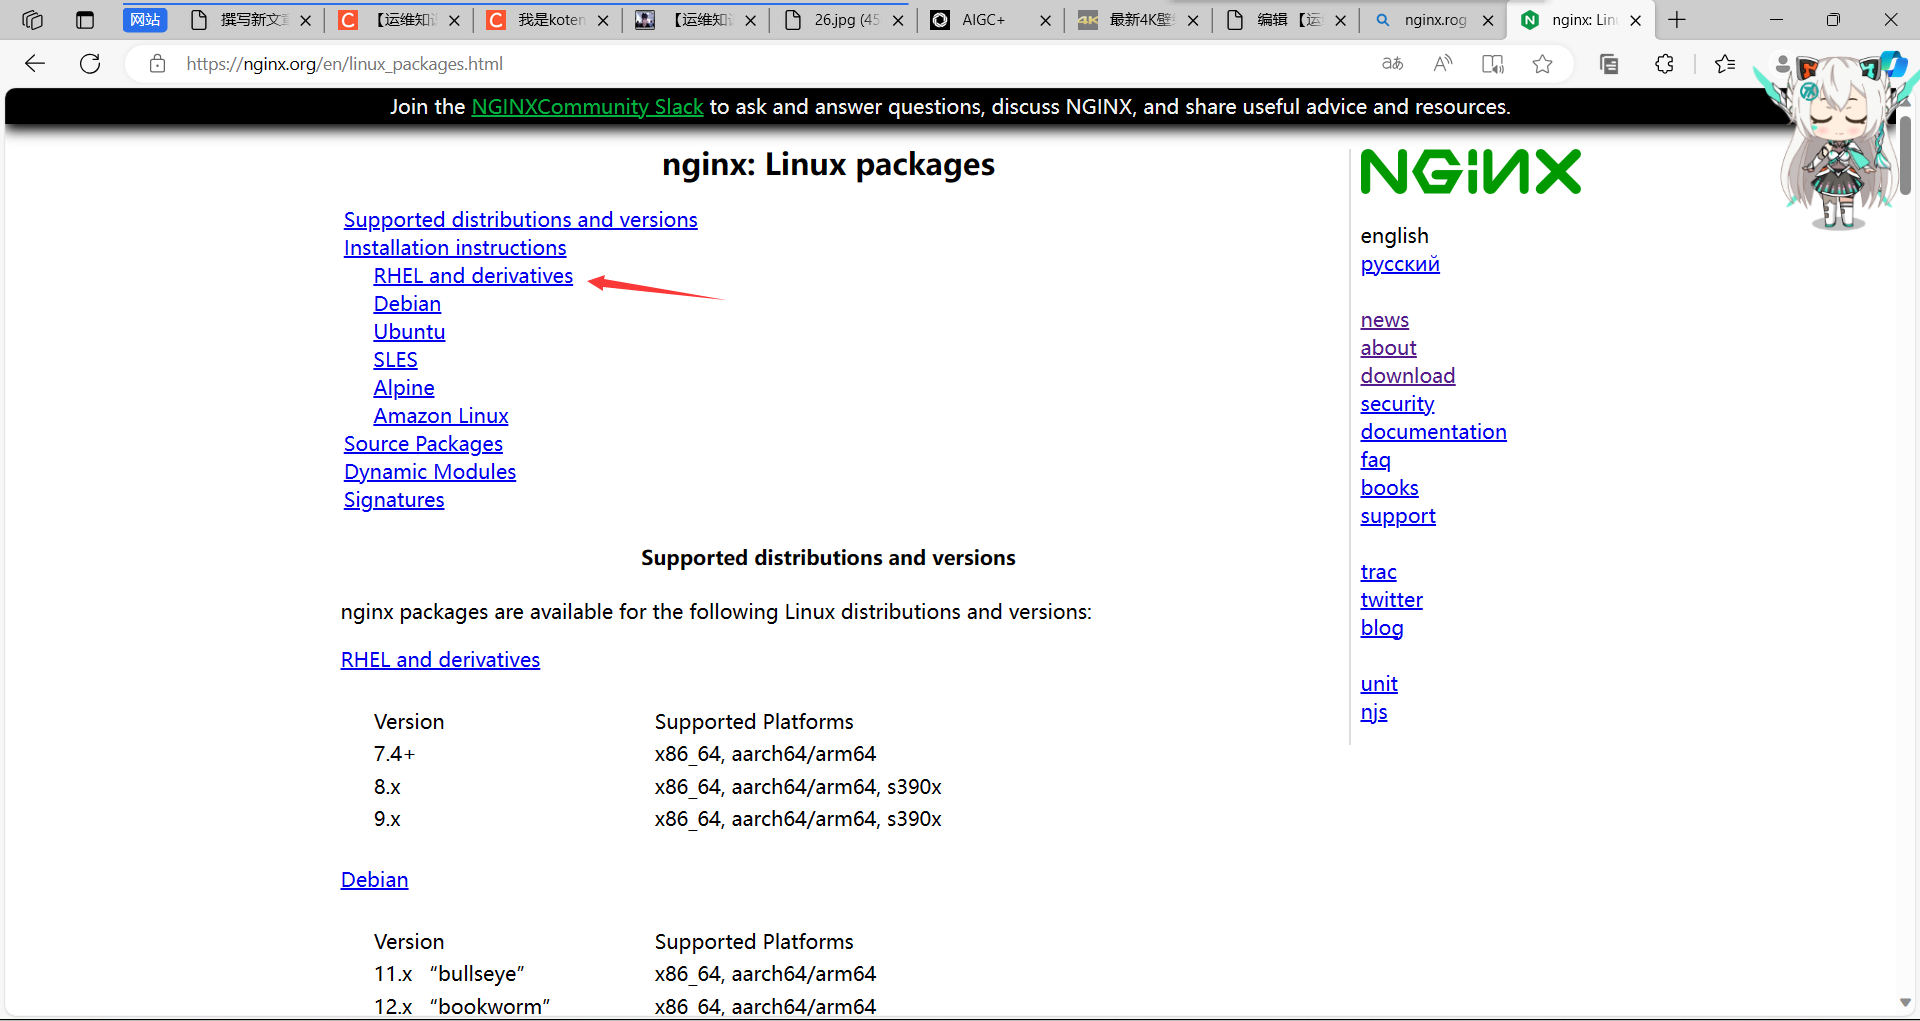
第一步:安装官网yum源,去官网(nginx news)
第二步:安装
第三步:配置Nginx
第四步:设置开机自启动
第五步:检查Nginx是否运行
1、查看nginx状态
2、netstat -tunlp #查看端口,不解析列出
Nginx启动方式(两种选择一种方式使用,不能混合使用)
Nginx配置文件
Nginx多业务实现方式
1、使用不同端口号表示不同的业务
编辑
2、使用不同的IP地址(多个网卡 不同的IP)
3、可以使用不同的域名
Nginx日志管理
1、定义语法格式
2、Nginx默认日志语法
3、Nginx日志格式允许包含的内置变量
4、access_log日志配置语法
5、Nginx Access日志配置
6、Nginx日志切割
Nginx与Apache区别
1、Nginx采用Epool网络模型,I/O异步非阻塞,效率高,Apache采用Select模型
2、Nginx处理静态文件好,静态处理性能比Apache高三倍以上
静态文件:图片 视频 js css文件 (放到存储服务器NFS)
动态数据:文字 个人信息 家庭住址 (放到数据库)
3、Nginx可以在不间断服务的情况下进行版本升级,社区活跃、各种高性能模块出品迅速,所以我们需要用稳定版本。
4、Apache的rewrite比nginx强大,在rewrite频繁的情况下,用Apache,Apache成熟稳定,bug比较少,Apache对PHP配置比较简单,Nginx需要配合其他后端使用。
Nginx安装方式
1、yum安装
2、编译安装,通过编译源代码安装
yum安装,包含安装包的有两个仓库。
一个是epel仓库 #版本较低,配置不宜读
二是通过官网的仓库安装 #可以选择版本较新,配置易读
Nginx安装流程
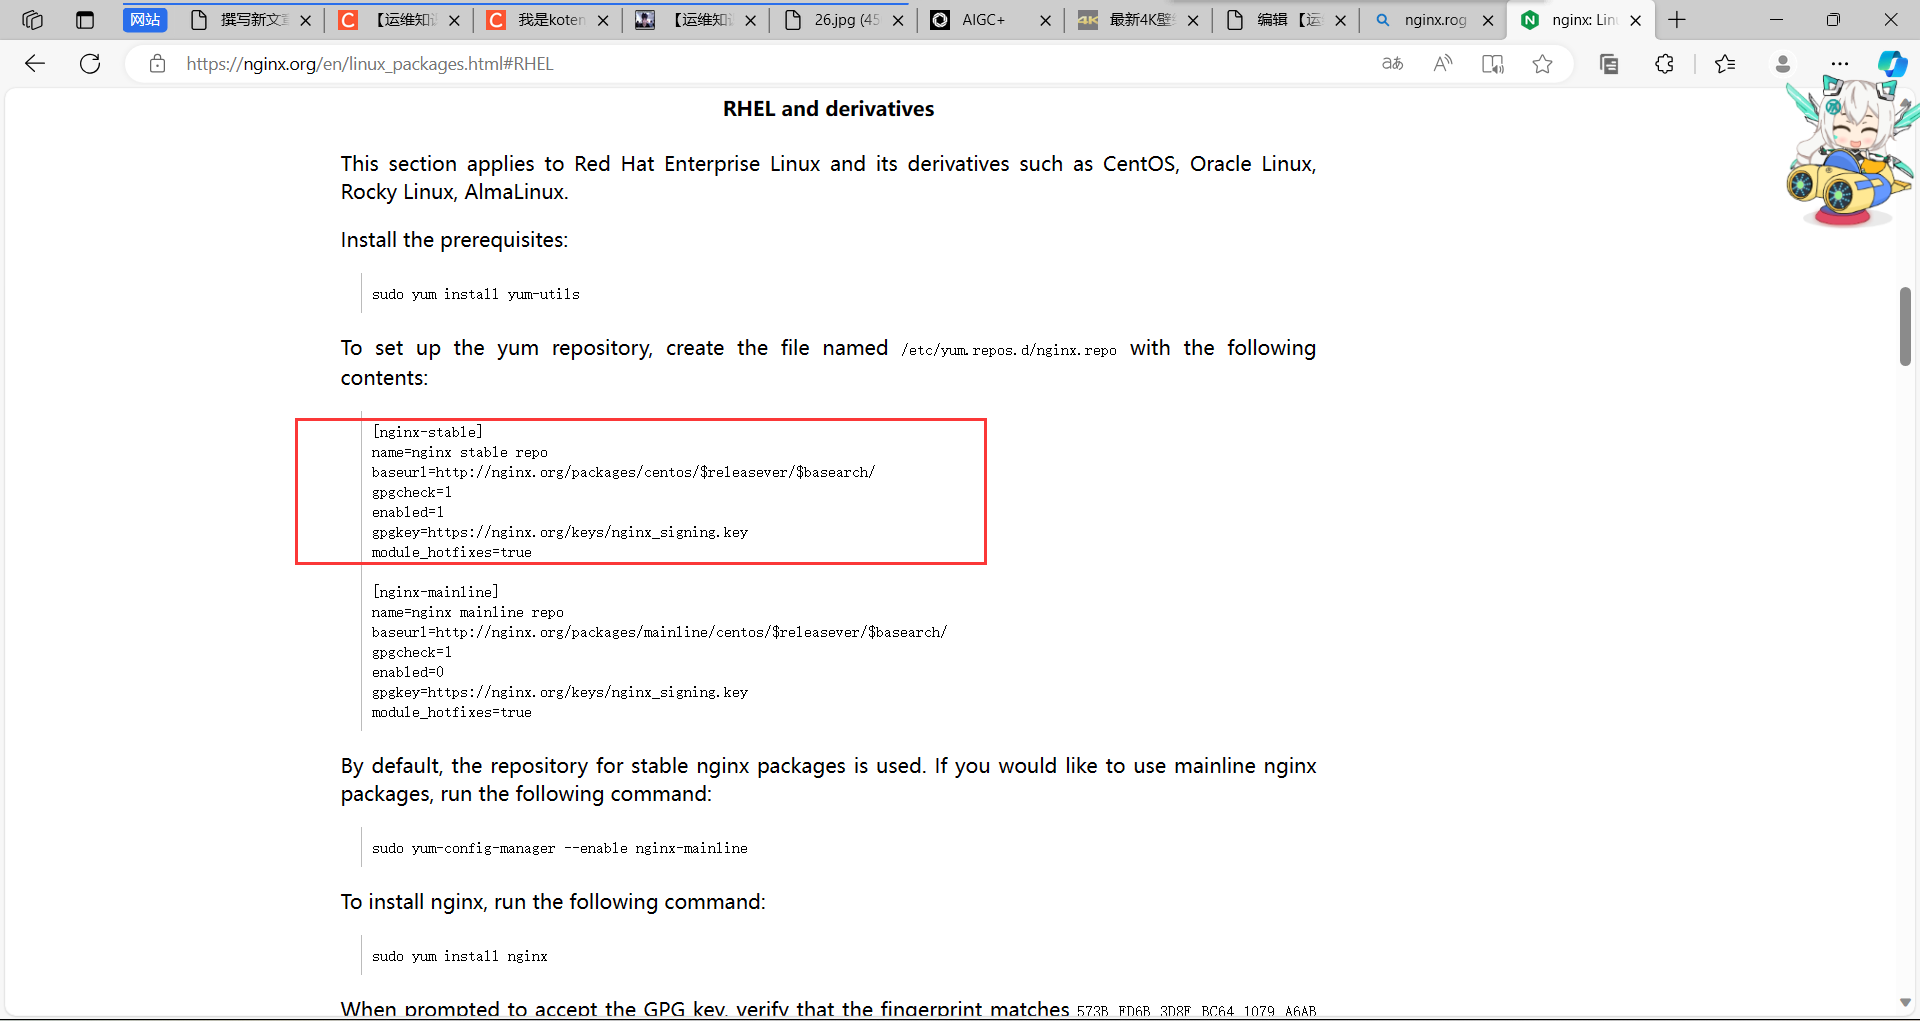
第一步:安装官网yum源,去官网(nginx news)


[nginx-stable]                     #仓库名称
name=nginx stable repo             #名称
baseurl=http://nginx.org/packages/centos/$releasever/$basearch/    #官网连接地址
gpgcheck=1                         #检查nginx的完整性,通过MD5校验方式
enabled=1                          #是否开启此仓库,1为开启,0为关闭,适用于临时关闭
gpgkey=https://nginx.org/keys/nginx_signing.key  #MD5存放链接
module_hotfixes=true
第二步:安装
[root@NFS ~]# yum -y install nginx
Loaded plugins: fastestmirror
Loading mirror speeds from cached hostfile
 * base: mirrors.aliyun.com
 * extras: mirrors.aliyun.com
 * updates: mirrors.aliyun.com
base                  | 3.6 kB     00:00
epel                  | 4.7 kB     00:00
extras                | 2.9 kB     00:00
nginx-stable          | 2.9 kB     00:00
updates               | 2.9 kB     00:00
nginx-stable/7/x86_64/p |  81 kB   00:01
Resolving Dependencies
--> Running transaction check
---> Package nginx.x86_64 1:1.22.1-1.el7.ngx will be installed
--> Processing Dependency: libpcre2-8.so.0()(64bit) for package: 1:nginx-1.22.1-1.el7.ngx.x86_64
--> Running transaction check
---> Package pcre2.x86_64 0:10.23-2.el7 will be installed
--> Finished Dependency Resolution

Dependencies Resolved

=============================================
 Package
       Arch   Version     Repository    Size
=============================================
Installing:
 nginx x86_64 1:1.22.1-1.el7.ngx
                          nginx-stable 797 k     #在这里看是在nginx-stable仓库下载的
Installing for dependencies:
 pcre2 x86_64 10.23-2.el7 base         201 k

Transaction Summary
=============================================
Install  1 Package (+1 Dependent package)

Total download size: 998 k
Installed size: 3.3 M
Downloading packages:
warning: /var/cache/yum/x86_64/7/nginx-stable/packages/nginx-1.22.1-1.el7.ngx.x86_64.rpm: Header V4 RSA/SHA256 Signature, key ID 7bd9bf62: NOKEY
Public key for nginx-1.22.1-1.el7.ngx.x86_64.rpm is not installed
(1/2): nginx-1.22.1-1.e | 797 kB   00:06
(2/2): pcre2-10.23-2.el | 201 kB   00:06
---------------------------------------------
Total           155 kB/s | 998 kB  00:06
Retrieving key from https://nginx.org/keys/nginx_signing.key
Importing GPG key 0x7BD9BF62:
 Userid     : "nginx signing key <signing-key@nginx.com>"
 Fingerprint: 573b fd6b 3d8f bc64 1079 a6ab abf5 bd82 7bd9 bf62
 From       : https://nginx.org/keys/nginx_signing.key
Running transaction check
Running transaction test
Transaction test succeeded
Running transaction
  Installing : pcre2-10.23-2.el7.x86_6   1/2
  Installing : 1:nginx-1.22.1-1.el7.ng   2/2
----------------------------------------------------------------------

Thanks for using nginx!

Please find the official documentation for nginx here:
* https://nginx.org/en/docs/

Please subscribe to nginx-announce mailing list to get
the most important news about nginx:
* https://nginx.org/en/support.html

Commercial subscriptions for nginx are available on:
* https://nginx.com/products/

----------------------------------------------------------------------
  Verifying  : pcre2-10.23-2.el7.x86_6   1/2
  Verifying  : 1:nginx-1.22.1-1.el7.ng   2/2

Installed:
  nginx.x86_64 1:1.22.1-1.el7.ngx    #查看安装版本,也可以通过nginx -v查看

Dependency Installed:
  pcre2.x86_64 0:10.23-2.el7

Complete!
[root@NFS ~]#
第三步:配置Nginx
第四步:设置开机自启动
[root@NFS ~]# systemctl start nginx
[root@NFS ~]# systemctl enable nginx
Created symlink from /etc/systemd/system/multi-
user.target.wants/nginx.service to
/usr/lib/systemd/system/nginx.service.
[root@NFS ~]#
第五步:检查Nginx是否运行
1、查看nginx状态
[root@NFS ~]# systemctl status nginx
● nginx.service - nginx - high performance web server
   Loaded: loaded (/usr/lib/systemd/system/nginx.service;
enabled; vendor preset: disabled)
   Active: active (running) since Fri 2023-03-31 10:27:29
CST; 1min 40s ago
      Docs: http://nginx.org/en/docs/
 Main PID: 3271 (nginx)
   CGroup: /system.slice/nginx.service
           ├─3271 nginx: master process /u...
           └─3272 nginx: worker process

Mar 31 10:27:29 NFS systemd[1]: Starting n...
Mar 31 10:27:29 NFS systemd[1]: Can't open...
Mar 31 10:27:29 NFS systemd[1]: Started ng...
Hint: Some lines were ellipsized, use -l to show in full.
[root@NFS ~]#
2、netstat -tunlp #查看端口,不解析列出
[root@NFS ~]# netstat -tunlp|grep '80'     #查看端口并过滤80
tcp        0      0 0.0.0.0:80              0.0.0.0:*
LISTEN      3271/nginx: master
[root@NFS ~]# id nginx           #安装nginx,自动创建了虚拟用户
uid=997(nginx) gid=995(nginx) groups=995(nginx)
[root@NFS ~]#

#去网站上传东西,用户必须是nginx虚拟用户
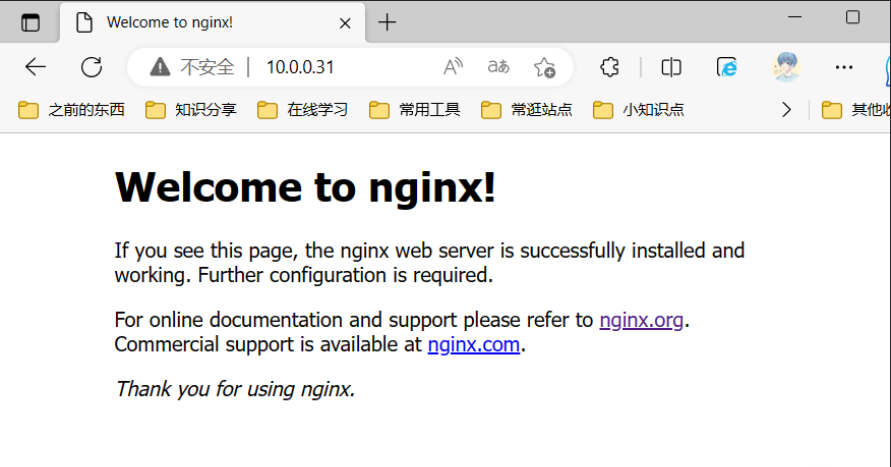
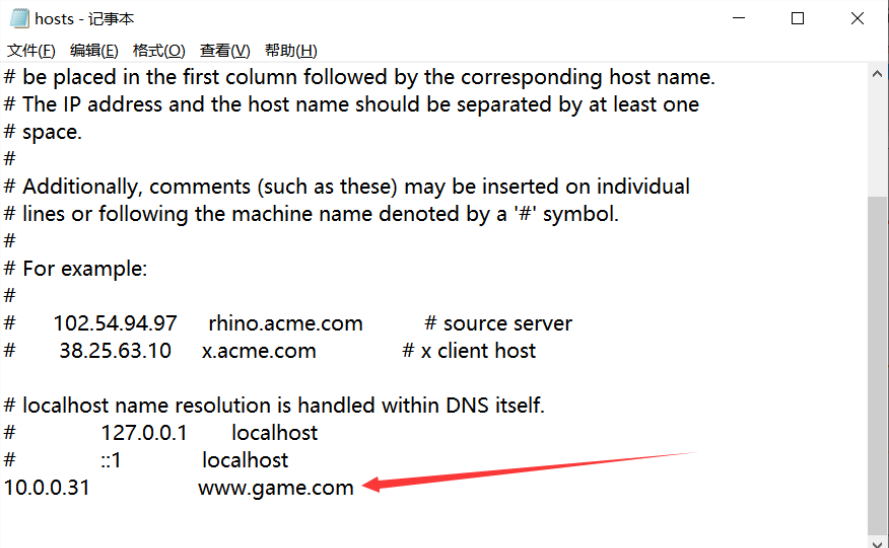
通过官网下载的Nginx,访问就是这个状态,如果想用域名访问,可以Windows修改hosts
Nginx启动方式(两种选择一种方式使用,不能混合使用)
1、使用systemctl方式管理Nginx
systemctl start nginx #开启
systemctl stop nginx #停止
systemctl restart nginx #重启
systemctl reload nginx #加载
systemctl status nginx #状态
systemctl enable nginx #开机自启动
systemctl disable nginx #禁止开机自启动
2、使用绝对路径方式管理Nginx
/usr/sbin/nginx #启动Nginx
/usr/sbin/nginx -s stop #停止Nginx
/usr/sbin/nginx -s relload #重新加载配置,不停机维护
/usr/sbin/nginx -s stop && /usr/sbin/nginx #重启Nginx
Nginx配置文件
1、主配置文件
/etc/nginx/nginx.conf #Nginx主配置文件
[root@NFS ~]# cat /etc/nginx/nginx.conf
#这里是核心区块
user  nginx;                                #虚拟用户,可以自定义
worker_processes  auto;                     #work子进程的数量,cpu核心数有几个,这个地方就是几个,之前版本数量都是1

error_log  /var/log/nginx/error.log notice; #错误日志存放的路径
pid        /var/run/nginx.pid;              #运行后的PID号的路径,用于停止启动时候杀死进程

#这里是事件模块
events {
    worker_connections  1024;                #每个进程最大的并发连接数,最高数量是65535,每个核心的并发数,等于总nginx的并发数,这个最大连接数量,还与文件描述符有关(打开文件最大数量)
}


http {
    include       /etc/nginx/mime.types;     #支持的媒体类型
    default_type  application/octet-stream;  #如果找不到对应的类型,默认下载的方式打开

    log_format  main  '$remote_addr - $remote_user [$time_local] "$request" '
                      '$status $body_bytes_sent "$http_referer" '
                      '"$http_user_agent" "$http_x_forwarded_for"';

    access_log  /var/log/nginx/access.log  main; #默认main格式

    sendfile        on;       #文件的高效传输
    #tcp_nopush     on;

    keepalive_timeout  65;    #长链接超时时间,65秒没有新的请求

    #gzip  on;                #是否开启压缩

    include /etc/nginx/conf.d/*.conf;    意思是*.conf里的配置内容在http模块下面
}
[root@NFS ~]#

#虽然*.conf的路径是在/etc/nginx/conf.d目录下,但是实际路径是/etc/nginx,也就是说直接把配置写进去或者引用是一个道理。

配置两种写法:
1、cat /etc/nginx/conf.d/default.conf
2、
/etc/nginx/conf.d/default.conf #默认网站配置文件
server{

        listen 80;                        #监听的端口 IP地址

        server_name www.game.com;         #域名 localhost表示本机

        location / {                      #用户访问域名默认返回的内容,因为访问默认
                                          #www.game.com默认是有/,所以这里有根

        root /code;                      #指定用户去/code目录下找代码

        index index.html;                #默认给用户返回index.html 或者index.htm

        }

}

可以一个配置文件写多个配置内容,也可以多个配置文件写多个配置内容
测试完配置文件是否正确:nginx -t
可以vim +7 nginx.conf,直接跳转到第七行
测试完后重启nginx生效:systemctl restart nginx
配置代码目录:没有目录报404,有目录没有文件报403
使用curl,默认会返回配置的文件内容,但是浏览器访问,默认是访问
www.game.com/index.html
2、代理配置文件
3、编码相关配置文件
4、管理相关配置文件
5、日志相关配置文件
Nginx多业务实现方式
1、使用不同端口号表示不同的业务
[root@NFS 4]# vim /etc/nginx/conf.d/default.conf
server {
        listen 80;
        server_name www.game.com;#小霸王游戏
        location /{
                root /code/1;
                index index.html index.htm;
        }
}
server {
        listen 81;
        server_name www.game.com;#植物大战僵尸
        location /{
                root /code/2;
                index index.html index.htm;
        }
}
[root@NFS 4]# nginx -t
nginx: the configuration file /etc/nginx/nginx.conf syntax is ok
nginx: configuration file /etc/nginx/nginx.conf test is successful
[root@NFS 4]# systemctl restart nginx
[root@NFS 4]#
修改windows的本地hosts解析
windows浏览器分别访问www.game.com和www.game.com:81
2、使用不同的IP地址(多个网卡 不同的IP)
可以一个端口多个IP,解决端口不够用的问题
修改IP,写在listen前面,listen 10.0.0.88:80,
写在server_name那里,就算是域名匹配了,也能正常访问,但是不算IP地址匹配了。
3、可以使用不同的域名
[root@Web02 ~]# cat /etc/nginx/conf.d/server1.conf
server {
    listen       80;
    server_name  test1.koten.com;
    root /code/server1;
    index index.html;
    ...
}
[root@Web01 ~]# cat /etc/nginx/conf.d/server2.conf
server {
    ...
    listen       80;
    server_name  test2.koten.com;
    root /code/server2;
    index index.html;
}
Nginx日志管理
Nginx的日志记录模式非常灵活,每个级别的配置都有各自的独立的访问日志,日志格式通过log_format命令定义。
1、定义语法格式
# 配置语法: 包括: error.log access.log
Syntax: log_format name [escape=default|json] string ...;
Default: log_format combined "...";
Context: http
2、Nginx默认日志语法
log_format  main  '$remote_addr - $remote_user [$time_local] "$request" '
                      '$status $body_bytes_sent "$http_referer" '
                      '"$http_user_agent" "$http_x_forwarded_for"';
3、Nginx日志格式允许包含的内置变量
$remote_addr        # 记录客户端IP地址
$remote_user        # 记录客户端用户名
$time_local         # 记录通用的本地时间
$time_iso8601       # 记录ISO8601标准格式下的本地时间
$request            # 记录请求的方法以及请求的http协议
$status             # 记录请求状态码(用于定位错误信息)
$body_bytes_sent    # 发送给客户端的资源字节数,不包括响应头的大小
$bytes_sent         # 发送给客户端的总字节数
$msec               # 日志写入时间。单位为秒,精度是毫秒。
$http_referer       # 记录从哪个页面链接访问过来的
$http_user_agent    # 记录客户端浏览器相关信息
$http_x_forwarded_for #记录客户端IP地址
$request_length     # 请求的长度(包括请求行, 请求头和请求正文)。
$request_time       # 请求花费的时间,单位为秒,精度毫秒
# 注:如果Nginx位于负载均衡器,nginx反向代理之后, web服务器无法直接获取到客 户端真实的IP地址。
# $remote_addr获取的是反向代理的IP地址。 反向代理服务器在转发请求的http头信息中,
# 增加X-Forwarded-For信息,用来记录客户端IP地址和客户端请求的服务器地址。
4、access_log日志配置语法
Syntax: access_log path [format [buffer=size] [gzip[=level]] [flush=time] [if=condition]];
access_log off;
Default: access_log logs/access.log combined;
Context: http, server, location, if in location, limit_except
5、Nginx Access日志配置
server {
    listen 80;
    server_name code.koten.com;

    #将当前的server网站的访问日志记录至对应的目录,使用main格式
    access_log /var/log/nginx/code.koten.com.log main;
    location / {
        root /code;
    }

    #当有人请求改favicon.ico时,不记录日志
    location /favicon.ico {
        access_log off;
        return 200;
    }
}
6、Nginx日志切割
使用logrotate切割日志
[root@nginx conf.d]# cat /etc/logrotate.d/nginx
/var/log/nginx/*.log {
        daily                   # 每天切割日志
        missingok               # 日志丢失忽略
        rotate 52               # 日志保留52天
        compress                # 日志文件压缩
        delaycompress           # 延迟压缩日志
        notifempty              # 不切割空文件
        create 640 nginx adm    # 日志文件权限
        sharedscripts
        postrotate      # 切割日志执行的命令
                if [ -f /var/run/nginx.pid ]; then
                        kill -USR1 `cat /var/run/nginx.pid`
                fi
        endscript
}
日志切割后的效果
[root@Web01 ~]# ll /var/log/nginx/
total 4044
-rw-r----- 1 www adm  54438 Oct 12 03:28 access.log-20181012.gz
-rw-r----- 1 www adm  28657 Oct 13 03:48 access.log-20181013.gz
-rw-r----- 1 www adm  10135 Oct 12 03:28 error.log-20181130.gz
-rw-r----- 1 www adm   7452 Oct 13 03:48 error.log-20181201.gz
goaccess日志监控
第一步: 安装

[root@web01 ~]# yum -y install goaccess

第二步: 配置
[root@web01 ~]# vim /etc/goaccess/goaccess.conf
time-format %H:%M:%S
date-format %d/%b/%Y
\# NCSA Combined Log Format
log-format %h %^[%d:%t %^] "%r" %s %b "%R" "%u"


第三步: 通过命令行测试
[root@web01 ~]# goaccess -f /var/log/nginx/access.log

第四步: 希望把页面存储下来使用浏览器进行访问
vim go.koten.com
server {
        listen 80;
        server_name go.koten.com;

        location / {
        root /code/log;
        index index.html;
        }
}
{root@web01 ~]# mkdir /code/log
[root@web01 ~]# nohup goaccess -f /var/log/nginx/access.log -o /code/log/index.html -p /etc/goaccess/goaccess.conf --real-time-html &